The weather finally cooled off enough to bake bread again. I was seriously going to have to buy a loaf soon if we hadn't had some relief. The bread I make is so easy anyone can do it. I have the recipe memorized, but I encourage you to get a copy of the "Artisan Bread in 5 Minutes a Day" book. There are lots of variations on the main recipe and every one of them that I've tried has turned out well. Let me show you, in a nutshell, how to do it. Do not be afraid, Grasshopper, you can do this. First, gather your ingredients:
3 cups of lukewarm water
1 1/2 tablespoons of yeast ( I like Red Star brand. There's the regular and the quick rise...use either one)
1 1/2 tablespoons of salt (I use fine sea salt, as I've read that the iodized salt can affect the yeast. ???)
6 1/2 cups All-pupose flour (I buy the unbleached. It's the same color as the bleached so what's the point??)
Edit: My biology major college student son has informed me that iodized salt affects the dough in this way; Iodine in salt is held as Nal and when mixed with water, breaks the ionic bond to form Na+ and l-the free iodine ions are easily taken up by the yeast cells where it de-natures the free-floating cysteine and methionine preventing protein synthesis. This prevents yeast from replicating, meaning that your bread does not rise as effervescently. In other words, the dough won't rise as much. Use sea salt instead. **Thanks, Booie. Love, Mom**
This recipe makes 4 one-pound loaves. You can easily halve it to make just 2 if you so desire. If the math befuddles you, call a third grade teacher. :)
Put all this together in a large bowl. Remember, it's going to swell up. Stir it well and let it sit on the counter, covered, for a couple of hours. You can spray some plastic wrap and loosely drape it over the dough, or you can wet a nice fuzz-free kitchen towel and use that. Either one is fine. Be sure to spray the plastic, though, or you'll have a gooey sticky mess when you pull it away after it's risen.
All the above takes maybe 3 minutes and it will look like this when you first stir it:
and it will look like this after it's risen:
It's best to do this the day before you want to bake bread, because it's really sticky. Refrigerate the dough, covering loosely. The next day, or baking day (the dough can be refrigerated for up to 2 weeks) get a bit of flour and dust the top of the dough, then with one hand, scoop out a grapefruit size piece of dough, and with a bit more flour, over the kitchen sink to keep the mess contained, lightly sprinkle with more flour, as you stretch the dough from the top around to the bottom on all sides. Basically, just form it into a loaf. Don't use too much flour, though, just enough to keep it from being crazy sticky. Place it on a pizza peel, or an old bread board that has been dusted generously with cornmeal. This is where it will rest for the next hour or 90 minutes. Remember the dough has been chilled for a day or more. It has to warm up, and it will raise some more, as well:


All of this takes maybe a minute or two. Really, that's all. Let it rest for the alloted time. About 20 minutes before you're ready to bake it, put a pizza stone on the middle rack in your oven, then turn the oven on to 450 degrees. The stone needs to heat up, too. Now, get a serrated bread knife and slash the bread in a few places. This will help the bread to rise even more while it's baking. Use a slight dusting of flour on the top so the knife will go through, or you can wet the knife between each slash. If I'm making a cheese bread, I also sprinkle on some finely grated cheddar at this point, or some Parmesan/Romano/Asiago cheese in a can from the fridge. Both are delicious:


When the oven indicates the temperature has been reached, put a pan or something that can take the heat on the shelf below the stone. You'll want to put a cup of very hot water in it, because the steam helps create the great artisan crust on the bread. I didn't take a pic of this part, and if you forget it, it's no great shakes, but I do think it adds something to the bread. Anywhoo, now it's time to bake. You might need a spatula to assist, but the idea is to slide the bread off the board it's been rising on, onto the hot stone in the oven. Do that as expediently as possible, so as not to cool the oven down. Add that water for steam, set the timer for 25 minutes for that size loaf (you know your oven, if you have an oven that takes longer than a recipe says to bake something, just add a couple more minutes to the baking time) and wait...and wait....and wait...when you're anxious for fresh bread it seems like a very long time. At my house it's only:

I do have to take a peek, but try not to more than once. You really don't want the oven to cool down too much.
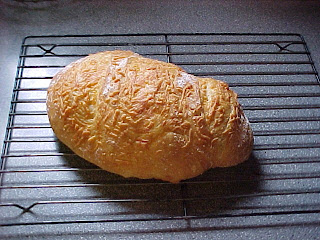
When the timer beeps, take out your bread. The stone will be exremely hot and stay that way for quite a while. Use an oven mitt or some protection, to transfer your bread to a cooling rack. It's tempting to rip it open RIGHT NOW AND SLATHER ON SOME BUTTER, but try not to do that. Wait until the bread cools for a while...completely is best, but at least 15-20 minutes, at least. There is still some baking going on inside, and something about re-absorbing something, but it will be better if you wait. Here is my finished loaf:
I wish you could smell how my house smells right now. MMMMM. Not counting the rising times and baking time, and time spent in refrigerator camp, it does really only take 5 minutes or so...maybe a couple more for beginners, but it is that easy. No kneading, no judging for elasticity, just great, artisan bread. So, what are you waiting for??? You can do this. I want to hear back from everyone that tries it. You can thank me later :) btw...if you know you just aren't going to do this, but want some fresh bread anyway, check out Farmer's Markets around the area. I know there are some great bakers out there showing up to sell their wares.
Blessings,
Brenda


No comments:
Post a Comment